Mungo Wants to Cut Down Trees with a Small Forest Axe

In case anyone is reading this, and is interested in buying me a nice Christmas present... I would like a Gränsfors Bruks Small Forest Axe from Lee Valley Tools.


It has a 3-1/4" face, a 1-1/2 lb head, and a 19" handle. Same size as the Hunters Axe but a more traditional pattern and poll. The blade is thin. The handle is long enough to allow powerful chopping but not too long so it will fit into a rucksack. Practical for splitting wood for the fire or cutting small-diameter limbwood for starter fuel. It comes with a grain-leather sheath.


It is $89.00 and their store is 2 blocks from where I work.

See a really nice PDF poster on Gränsfors Bruks' wares.

Build a Log Cabin, Alone in the Wilderness

I have for many years dreamed of building a log cabin. From time to time I watch a video I burned to DVD - Alone In The Wilderness. It is a documentary about Richard Proenneke, who built his own cabin in the wilderness near Twin Lakes starting in 1968, in what is now Lake Clark National Park & Preserve in Alaska.


Alone in the wilderness, lost in the jungle, the boy is searching, searching!
The swelling waters, the far-away mountains, and the unending path;
Exhausted and in despair, he knows not where to go,
He only hears the evening cicadas singing in the maple-woods.

The Ten Oxherding Pictures, I. by Kaku-an


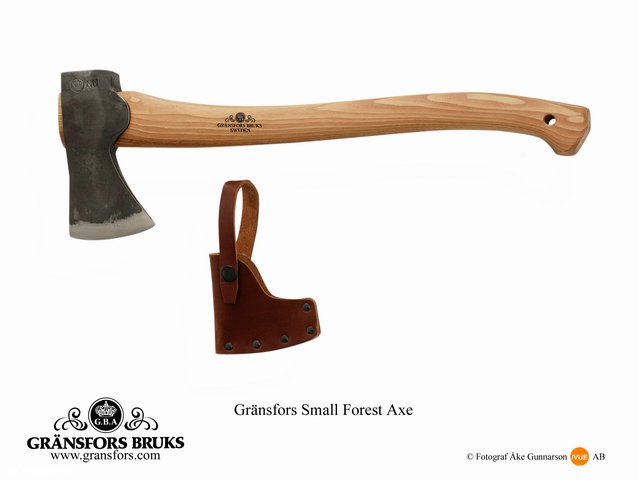
Select your logs. Straight, 8 to 10 inches in diameter, 16 foot logs, with minimal tapering.

Fell them in early winter as cool temperatures allow for slower drying periods, which reduces cracking and splitting, plus it is easier to haul the logs out of the woods over snowy terrain.

Season your logs - air-dry the logs for one to two years-the longer the better. Logs should be stacked off the ground with stickers-smaller diameter logs-placed between the courses. This allows for maximum airflow around the logs and promotes more even drying. You should also partially peel off the bark using a draw knife before the logs are stacked. This will increase their drying rate and cause only minimal cracking and splitting. However, before building begins, you must remove the remaining bark completely. It is a natural habitat for many different kinds of pests.

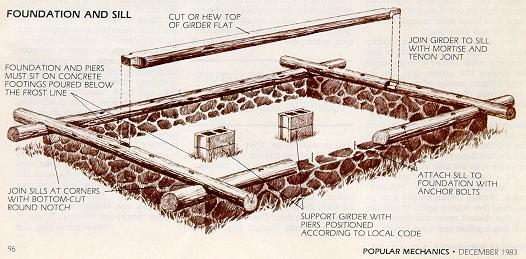
Many pioneer cabins were built without foundations because they were constructed in haste or meant to be temporary shelter. But a proper foundation is definitely required. Stone foundations traditional, but block and concrete walls are as good, or better, and they require less work.


If you don't want a full basement, you must excavate at least below the frost line, install footings and construct a wall up to 20 in. above grade level. You must also install piers within the foundation walls to support the floor girder. Also, install anchor bolts along the top of the walls to attach the sill. Begin floor construction by hewing or cutting flat the bottom of the sill logs. Then bore holes in the sill logs to accommodate the anchor bolts and install sill sealer or a termite shield according to the local building code. The corner joints are made by bottom notching the logs. Next, hew flat the top of the girder and install it over the support piers. Join it to the sill with a mortise and tenon joint. Drive 60d nails through the top of the tenon and into the mortise to complete the joint.

In a similar manner, hew or cut flat the top of the joists and install them between the girder and sill logs so they are flush with the top of the girder. Install the subflooring perpendicular to the direction of the joists. Now you're ready to start on the walls.

Many different types of notches can be used to join the logs, but a good choice for the beginning log builder is the technique shown here: the scribe, fit, round-notch method. It features semicircular notches cut in the bottom of the logs to fit over adjacent logs. Also, a V-shaped groove is cut down the length of each log bottom so the entire length can sit flush on the log below.

Although this method is slower than others, the corner joints are self-draining-water running down the outside of the house hits the log tops and runs off, instead of being trapped in the notch. The V-grooves also eliminate air drafts between the logs. The joints between courses do not need chinking, so you can avoid one of the most chronic maintenance problems of log homes: repairing cracked chinking.


Cutting the corner notches is a fivestep procedure:

  1. First, roll the log into position and sight along its length to make sure any crown is pointing to the outside of the wall. Try not to use logs that have more than a
    1-in. crown per 16 feet of length. Then secure the log with a log dog as shown in the drawing.
  2. Scribe the shape of the lower, log onto the uncut log using compass dividers with a pencil or marking crayon inserted in one leg. Rough-cut the notch with a chain saw, then finish it with a shallowsweep, long-handled gouge.
  3. Reposition the log, allowing the notch to seat. Then scribe the full length of the underside of the log running the blank leg of the dividers along the top of the lower log. Scribe both sides of the log to yield the two lines which define the V-groove.
  4. Cut the V-groove with a chain saw to a depth of 1/2 to 3/4 in. Remove the waste, then roll the log back into
    position and rescribe the corner notch as well as the log end extending past the notch. (By cutting the V groove, there is now some space between the scribed log and the one below.) Cut the notch to the new scribe line and cut the tail end of the log using a gutter adze. This tool yields a concave groove that is tighter and more attractive at the exposed log ends.
  5. Reposition the log, then pick up one end and drop it into place. This is called "thumping" and it will leave compression marks on the parts of the log that still need trimming. Make any necessary adjustments, then pack fiberglass insulation into the groove and roll the log into place. The fiberglass will act as a sort of "internal chinking."


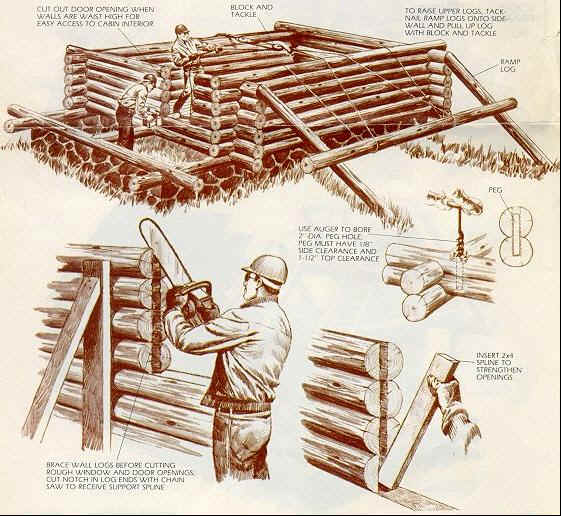
With the notching complete, bore a 2-in. dia. hole about 8 in. in from each corner and insert an alignment peg. The peg should be loose fitting, recessed about 1-1/2 in. below the top of the hole, and extend about halfway into the log below. Install these pegs every 8 ft. in the length of a log and within 1 ft. of each window and door opening.


As you move up the walls, alternate each successive log so that their smaller, tapered ends are not all on one end of the wall. Once the logs reach waist height, cut out the door opening. Brace the logs on both sides.

Of course, if your cabin is larger than the one shown here, you'll have several interior partitions. These can either be made with logs notched into the outside walls or with framed walls later on. Notching the logs is preferred because it yields the same interior finish on all walls and strengthens the structure.

When the logs reach the top of your planned window and door openings, brace the walls and cut out all the openings at once. Then cut a groove, as shown, in the log ends on both sides for a permanent stiffening spline. Cut and insert the spline and then add at least two more logs over the openings. The top wall log is called the plate log and it should be pegged at least every 4 ft.


The roof on the cabin shown is a combination of purlin and rafter construction to give an idea of what's involved with both. Normally, you would use only one. The purlins are set into notches cut in the gable ends; the rafters are notched into the plate log and ridge log.

Once purlins or rafters are installed, apply roofing boards for the roof sheathing. Next, apply 15-lb. roofing felt and either asphalt shingles or cedar shingles.

Finally, pre-assemble all window and door jambs, install them in the openings, and add the windows and doors. Allow 3/8-in. clearance for each vertical foot of opening above the jambs for the logs to settle. The spaces around the jambs should be chinked with okum (hemp and pine tar).

Wash the logs with detergent to remove any dirt, and then with a solution of two parts household bleach to one part water to lift out any stains. Rinse the logs thoroughly with water and let them dry for a week. Then apply a mixture of one part linseed oil to five parts turpentine to the outside of the logs. This treatment should be repeated every five years.

(Note: This article has been updated and originally derived from a Popular Mechanics issue - December, 1983)

Urban Combat Exercises

I took the pooch out for his morning stroll out to the pier this morning, and as I got closer to the base of the pier, along the marina walkway, I spied eight Canadian soldiers dressed in full camo in combat stance, all but one holding an assault rifle, held quite threateningly.


The eighth soldier, a tall, mean looking guy was clutching some kind of squad weapon, a light-machine gun with tripod (correction - bipod - actually this is what I saw anyway but brain made me write tripod). I gently removed my hands from my jacket pockets as I awkwardly walked through them and turned onto the pier. Monty held back about 50 feet, looking quite terrified of the soldiers. He finally charged through them, tail under his legs, hackles raised, eyes wild with worry. He then ran up to me and hid under my legs.


Smart beagle, I'd say. This is not something you see every day in downtown Toronto. 10 minutes later they extracted themselves in an orderly, watchful manner and seemed to vanish into the buildings and alleys nearby.


Shortly afterwards, Monty met a 3 1/2 month old West Highland Terrier wearing boots. They communed for a while and we made our way home.

How to Make a Bushcraft Fish Hook

This afternoon I went for a walk to Cherry Beach with Monty my trusty beagle.


There was a fine rain, but nothing to worry about - a dozen retiring swans drifted across the bay, and a few shuffling people with their boisterous dogs made the trek along the beach. I sat on a bench at the end of the point looking out across the bay, out beyond the islands into the expansive lake and let Monty wander about in the underbrush to visit smells and dogs and leaves.

Out came my Laguiole pocket knife and snap went a dead branch from a tree beside the bench (mine doesn't have a Damascus steel blade like the one below however. I wish.).


I began to whittle away, and soon I had the makings of a fish-hook. I had started with a perfectly straight length, and after in-cutting the curve to reveal the v-shaped base, I added a curve to the shaft to balance it out - two-inches of wood. The hook was next - this would need to be a length of bone or metal attached with pitch or cordage to against the flat base, pointing upwards at an angle toward the top of the shaft. I wandered along the beach and found a length of electrical copper wire, stripped the sheath off of it, induced metal fatigue in it until I had a one inch strip. I ground this against a large flat stone until I had a sharp, shiny copper point.


Carefully placing both the copper point and the wooden body in my jacket pocket, I retrieved a stick, half an arm's length from the beach. The willow bushes growing in the sand hold fast in part because of their extensive surface root network. Poking a few inches down in to the sand yielded a straight impediment. I scraped the stick along this line until a root appeared. I cut it into a 2 foot length, coiled it, and sat on a bench. Similar to spruce roots, willow roots work well as bushcraft cordage. Quickly I removed the 'bark' from the root, and again a sheath of fiber until the core remained. I split the core gently, ensuring that I peeled back the thicker side more radically until it balanced out, and soon I had a one foot length of flexible, strong cord. Had I boiled it the root in ashes it might have set the strength, but alas I had no fire and was not in the mood for one. I gently wrapped the base and the copper point with the root until I had a perfectly capable fish hook. Next would be some attachment point or hole for the line, which I didn't get around to. I suppose I might have melted some spruce resin and added powdered charcoal for a firm glue, and maybe fire-hardened the base.

All I needed was some line, some bait, a pole, a lake that was not contaminated as Lake Ontario and patience. But I had little patience left, the cold rain was hurting my exposed hands, and Monty was looking a little bedraggled.


I took apart the contraption, as I had not set it firmly, pocketed the fishhook base and the copper point, got Monty into the car and drove home.

Car Camping Canoe Camping Dream Camping

Car Camping:

Maybe 14 years ago I first went camping by myself, but it was drive-in camping in Algonquin, and I had my car and people uncomfortably near to my lot. It was okay, but boring - with people around and everything I needed at hand or in a cooler, and no-one to share it with - I got restless and left a day or two early. I think I got drunk and slept quite well. I did this a few times but found it a lonely occupation. Solo winter drive-in camping wasn't much different, even though there were very few people around. I had a few nice moments, like the time I walked out on the frozen lake, leaving a footprint trail across the snow-covered skating rink - no one was there and I found a small glassy patch of ice through which I saw a fish, and through which a fish saw me.


The next summer I went to the same camp spot, and after an evening keeping a raccoon at bay, and deciding to put my food all in the cooler and then in the tent, I sat at the picnic table and had a few lonely beers. Hours later as the glow in my propane lantern waned and as I had grown suitably drunk, I retired to my tent and passed out. An hour or two later I was awoken by the baritone yet staccato ruffing sound of a beer snuffling at my tent. I ran out of the tent, jumped on the picnic table and watched a black bear race off in to the woods. I had violated the golden rule - do not bring food into your tent in bear territory. Easily the dumbest thing I've ever done while camping (while not camping, I have done exceedingly dumber things, but that's another story or two).


Canoe Camping:

But all that was awkward and felt somehow inauthentic. The first solo canoe camping trip I took into the backcountry was anxiety-ridden. I canoed into Algonquin Park a few hours and found an island site soon after stopping at a first site and spotting bear scratches in the soil and moss by the water's edge - I'd literally jumped back in my canoe and paddled away. Soon I had arrived on an island, which I figured would be devoid of bears and other such carnivores. And it proved to be. The lake was mine, as no-one had made camp during the week I was up there. But as I fell asleep the incessant clicking of a bark beetle (or so I figure now) kept me wondering if there was a bear out there tapping against a tree with his bear-claws, plotting ways to attack and eat me. I don't know - all I know was that I stayed awake and terrified until first light came. But after a few trips on my own into the backcountry I guess I worked out my mental kinks and came to find each trip singularly refreshing and helped me grow. The quiet that the woods afforded me, the gentle lapping of the lake water, the smell of smoke and the sight of a camp fire was therapeutic and soon I found each camping trip left me more and more calm. Work was easier on my return, relationships were easier, life was easier on my return. I found myself day-dreaming about camping and when life got tough I went to my happy-place as it were. My happy-place was a camping trip.


Dream Camping:

I dream of taking a month or two off and camping in the Rocky Mountains, or in the Temagami region of Ontario. A canoe, a backpack, an axe and a saw - now that would be heaven on earth. We'll see.

Thoughts of Peace: The Origin of Consciousness in the Breakdown of the Bicameral Mind


My mental world is populated with all sorts of things that I will call thoughts: thoughts about people, quandaries, histories, plans, fears, anticipations, products, body, food, work, family, trivia, geography, biology and building materials.


These thoughts are a barrier to my Buddha nature.


I am learning to let these thoughts go, by observing them and quietly watching them move through my mental skies like clouds.

It humbles me to think that people are both buddha and also a seething bowl of squirming thoughts and desires like my thought world is. Six billion people. And that's just people. But animals other than humans are less cognitively-developed (if developed is the right word) as humans, and I suspect it is this self-awareness and development that is our both our glory and our point of divergence from peace.


I have had thoughts of bicameralism in my head since Dr. Tory Hoff taught me in university about Julian Jaynes' book 'The Origin of Consciousness in the Breakdown of the Bicameral Mind'.


I see Vipassana meditation as being an antidote to this breakdown and an effective method to incorporate elements of the unconscious into the superego and then back a step into the ego. Introspection, consciousness, self-awareness.

Thich Nhat Hanh spoke to my heart in 1992 when I read his book 'Peace Is Every Step: the Path of Mindfulness in Everyday Life'.


I don't have that book anymore, I gave it to a visitor from New Mexico who said in return I was welcome to drop by any time.


Today I am going to read a little.

Most Popular Posts